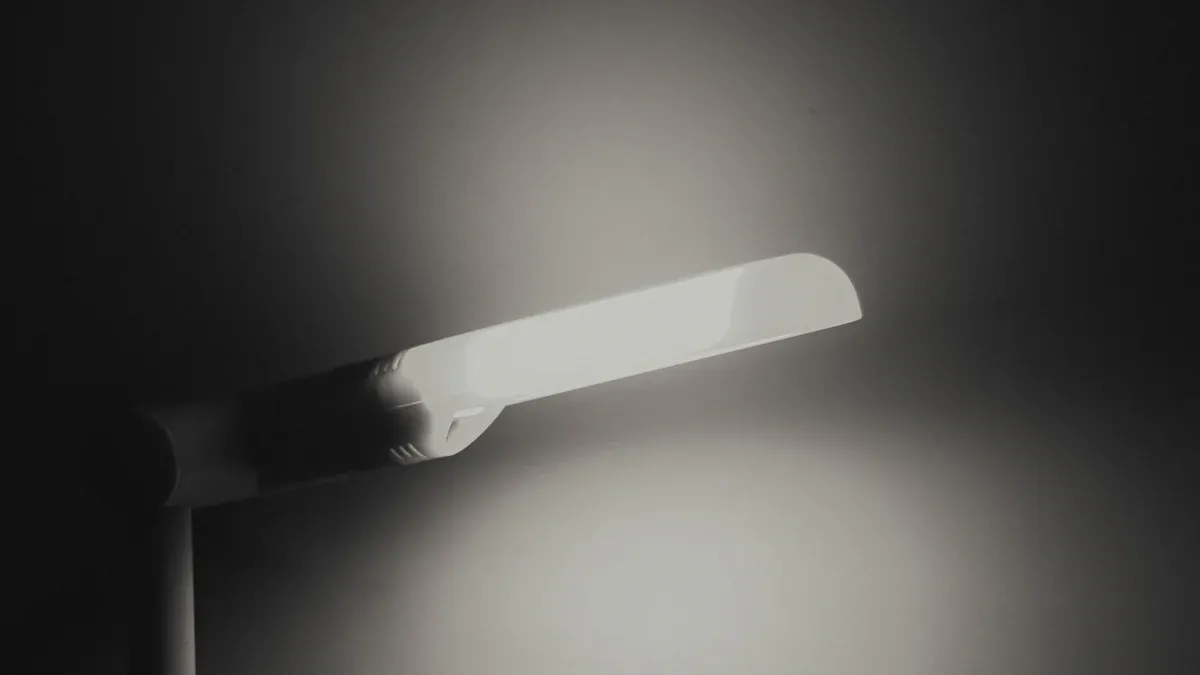
Custom aluminum die-casting LED housing helps protect your LED lights while enhancing the performance of your lighting systems. These housings offer strong, lightweight designs that are built to last. The housing effectively manages heat dissipation, ensuring your LEDs stay cooler and operate efficiently.
- Tolerances can be as precise as ±0.02 mm, allowing parts to fit together perfectly.
- Aluminum resists rust and withstands harsh outdoor weather conditions.
- High-quality alloys like ADC12 and A380, similar to those used in high-stress automotive die-castings, provide exceptional strength, durability, and excellent thermal conductivity, which can reduce LED temperatures by up to 25℃.
- Anodized finishes add extra protection and an attractive appearance.
With lighting die-castings, your LED lights will have a longer lifespan, improved performance, enhanced safety, and greater energy efficiency.
What Is Aluminium Die Casting LED Housing
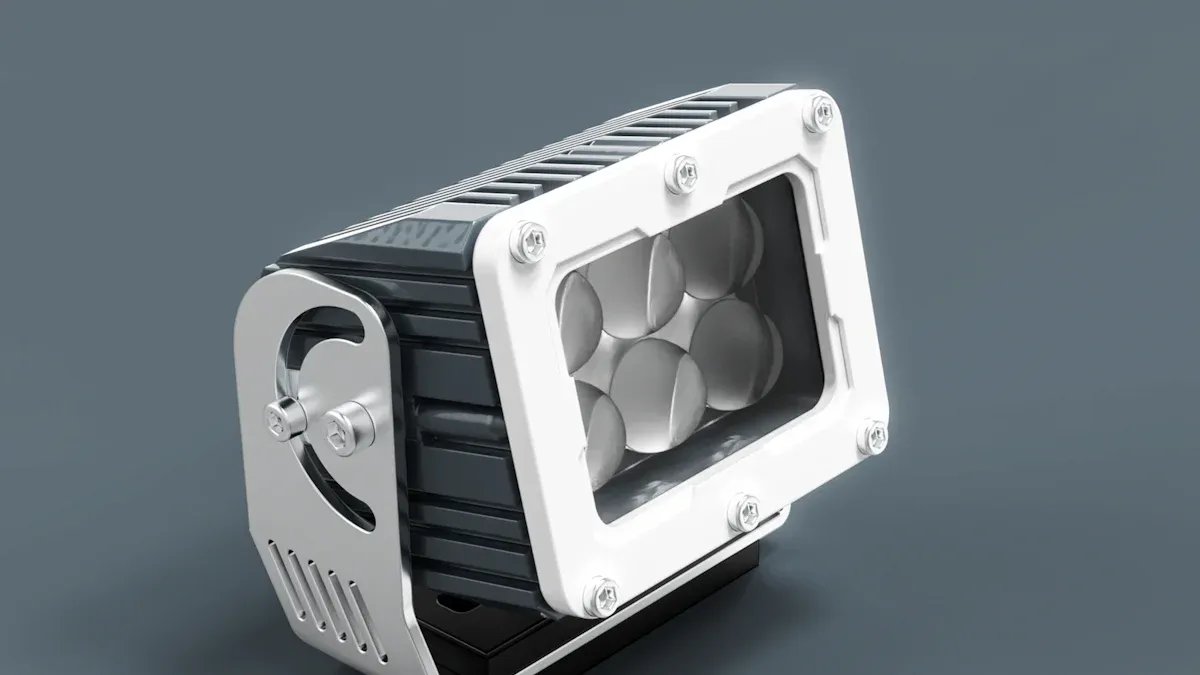
When you pick aluminium die casting led housing for your lights, you get protection, good performance, and many design choices. This housing is made by putting melted aluminum alloy into a steel mold using high pressure. The process makes parts with exact shapes and small details. These details are important for new LED lighting.
Tip: With aluminum die casting, you can make tricky designs. You can add heat sinks and mounting spots in one piece.
Aluminium die casting led housing is different from other ways of making things. Extrusion pushes aluminum through a shape to make simple forms. Die casting lets you make detailed 3D shapes with close measurements. You can design housings that fit your LEDs just right. You can also add things like wire channels or cooling fins.
Here is how the die casting process works for LED housings:
- Engineers use CAD software to design a mold. They think about the shape, wall thickness, and where vents go.
- The mold is made from strong tool steel. It can handle high pressure and heat.
- Melted aluminum is pushed into the mold at up to 30,000 psi.
- The metal cools fast and keeps every detail.
- The finished part comes out, gets trimmed, and is polished or machined.
There are many good things about using this method:
| Advantage | Explanation |
|---|---|
| Thermal Conductivity | It helps heat move away, so LEDs stay cool and work well. |
| Lightweight & Durable | Aluminum is strong but does not weigh much. |
| Cost-Effectiveness | Making many parts at once saves money and keeps quality high. |
| Design Flexibility | You can make hard shapes and add special features easily. |
| Corrosion Resistance | Aluminum does not rust, so products last longer. |
| Dimensional Accuracy | Close measurements make sure your parts fit together well. |
With aluminium die casting led housing, you get a product that works for both indoor and outdoor LED lights. You can count on its strength, exact fit, and its help in keeping your LEDs working great.
Design Considerations for Custom LED Housings
When you make a custom LED housing, you should think about four things. These are heat management, wall thickness, mounting features, and surface finish. Each one changes how well your LED works, how long it lasts, and how it looks. The die casting process lets you make housings that work well and look nice for your project.
Heat Management Strategies for LED Housings
LEDs get hot when they are on. If you do not control the heat, LEDs can get too hot, lose brightness, or stop working early. Aluminum die cast heat sinks help because aluminum moves heat away fast. Precision die casting lets you make shapes with lots of fins and channels. These parts give more surface area, so heat leaves the housing faster.
- Thin fins or pins help move heat and keep the housing light.
- You can change fin shapes, sizes, and spaces to control heat flow.
- Black anodizing helps the housing release heat better, up to 400%. It also keeps the housing safe from rust.
There are different ways to mount heat sinks. Each way changes how well heat moves, how hard it is to put together, and how much it costs:
| Mounting Method | Thermal Efficiency | Installation Effort | Vibration Resistance | Cost |
|---|---|---|---|---|
| Push Pins | Good | Minimal | Fair | Low |
| Spring Clips | Very Good | Low | Very Good | Low-Moderate |
| Screws | Excellent | Moderate | Excellent | Moderate |
| Adhesives | Good-Excellent | Moderate | Good | Moderate-High |
You can also use thermal pads or greases to help heat move from the LED to the housing. Hybrid mounting uses glue and fasteners for extra safety and better heat transfer.
Tip: Always pick your heat sink design and mounting style based on your LED’s power and where you will use it.
Wall Thickness Guidelines for Aluminum LED Housings
Wall thickness is important for the strength and quality of your aluminium die casting led housing. Walls between 1.5 mm and 4.0 mm are best. This helps stop warping, holes, and stress in the part. You can use special alloys like A380 to go as thin as 1.0 mm if you want less weight.
- Do not make walls thicker than 6 mm. Thick walls cool slowly and can get weak or have problems.
- Use draft angles and fillets to help metal flow and make it easy to take out of the mold.
- Keep wall thickness the same to help mounting features and stop bending.
Wall thickness changes how the housing cools and how strong it is. Thick walls cool slow, so the metal is softer but bends more. Thin walls cool fast, so the part is strong but can break easier. Here is a quick chart:
| Wall Thickness | Cooling Rate | Microstructure | Strength | Ductility | Defect Risk |
|---|---|---|---|---|---|
| Thin (<1.5 mm) | Fast | Fine, strong | High | Lower | Lower |
| Thick (>4 mm) | Slow | Coarse, ductile | Lower | Higher | Higher (porosity) |
Note: Keeping wall thickness the same makes your part better, saves money, and cuts down on waste.
Mounting and Integration Features for Die Casting Housings
You want your LED housing to be easy to put in and strong. Die casting lets you add features right into the housing. This means you need fewer extra parts and can build things faster.
| Design Feature | Design Recommendation | Benefit for LED Housing Installation |
|---|---|---|
| Bosses | Put at fastening points | Holds screws or bolts tightly |
| Ribs | Add near fastening spots | Gives more support and strength |
| Holes | Add for assembly | Makes it easy to attach and line up |
| Uniform Wall Support | Keep wall thickness the same | Stops bending when you fasten parts |
New aluminium die casting led housing designs often have quick-locking parts. These let you install each unit very fast. Good design helps you join and lift units easily, saving time and work. Accurate molds mean parts fit better and you make fewer mistakes.
Tip: Plan your mounting features early so you do not have to fix problems later.
Surface Finish Options on Aluminum Die Castings
The right surface finish keeps your LED housing safe and looking good. Powder coating is a top choice. It makes a strong, even layer that stops scratches, rust, sun damage, and chemicals. You can pick from different types:
- Epoxy coatings: Good for stopping chemical damage, best indoors.
- Polyester coatings: Good for outdoors, stops sun and weather damage.
- Hybrid coatings: Mix both types for more benefits.
Cleaning and roughening the part first helps the coating stick and last longer. Powder coating works well for tricky shapes and does not cost too much.
Anodizing is another way to finish the surface. It makes a hard, colorful layer and helps stop wear. But regular anodizing may not protect die cast aluminum well because of the silicon in it. Newer ways, like CastGuard™ anodizing, fix this and give much better rust protection, even in tough places.
Here is a chart to compare anodizing and powder coating:
| Criteria | Anodizing | Powder Coating (E-coating) |
|---|---|---|
| Wear & Abrasion Resistance | Very high (hard anodizing) | Good, better with topcoats |
| Corrosion Resistance | Good on pure aluminum, less on die cast | Excellent, even on tricky shapes |
| Coverage Uniformity | Can be patchy on tricky parts | Very even, even in small spaces |
| Appearance | Shiny, bright colors | Smooth, shiny or flat, less shiny |
| Suitability for Die Cast Aluminum | Not as good with silicon | Works very well |
| Production Cost | Higher, uses more energy | Lower, easy to scale, better for the planet |
Note: Pick your finish based on where you will use the product and how you want it to look. For outside or tough places, powder coating or new anodizing methods work best.
Material Selection for Custom Aluminum Die Casting LED Housings
The Most Common Aluminum Alloys Used in Die Casting for LED Housings
You have many choices when picking an aluminum alloy for your LED housing. The most common ones are ADC12 and A380. These alloys are strong, light, and help move heat away. ADC12 is light and has good strength. It works well for thin and detailed parts. A380 is strong for its weight and does not rust easily. You can use it for outdoor or tough LED housings.
Other alloys like A383, A360, AlSi10Mg, and AlSi12 are also used. They have different levels of flow, rust resistance, and heat movement. The table below shows the main alloys for LED housings:
| Alloy | Key Properties | Applications in LED Housings |
|---|---|---|
| ADC12 | Lightweight, strong, high thermal conductivity, good for thin walls | Streetlights, floodlights, automotive lighting |
| A380 | High strength, good corrosion resistance, excellent fluidity | Outdoor, industrial, and impact-resistant housings |
Tip: Pick your alloy based on where and how you will use your LED.
Physical and Mechanical Properties for Aluminum LED Housings
When you pick an alloy for aluminium die casting led housing, you should check some key properties. These are tensile strength, yield strength, hardness, elongation, density, and thermal conductivity. These things show how well your housing protects LEDs and handles heat.
| Property | Value | Significance for LED Housings |
|---|---|---|
| Tensile Strength | 310 MPa (45 ksi) | Gives strength and helps the part handle stress |
| Yield Strength | 160 MPa (23 ksi) | Keeps the housing strong when weight is added |
| Hardness (Brinell) | 80 HB | Makes the surface tough and hard to scratch |
| Elongation | 3.5% | Lets the part bend a little before breaking |
| Density | 2.71 g/cm³ | Makes the housing light and easy to use |
| Thermal Conductivity | 96 W/m·K | Moves heat away fast, which keeps LEDs cool |
| Corrosion Resistance | Natural oxidation resistance | Stops rust and damage from weather, good for outdoor LEDs |
Aluminum alloys are light and move heat well. The chart below shows how aluminum alloys compare to other materials for LED housings:
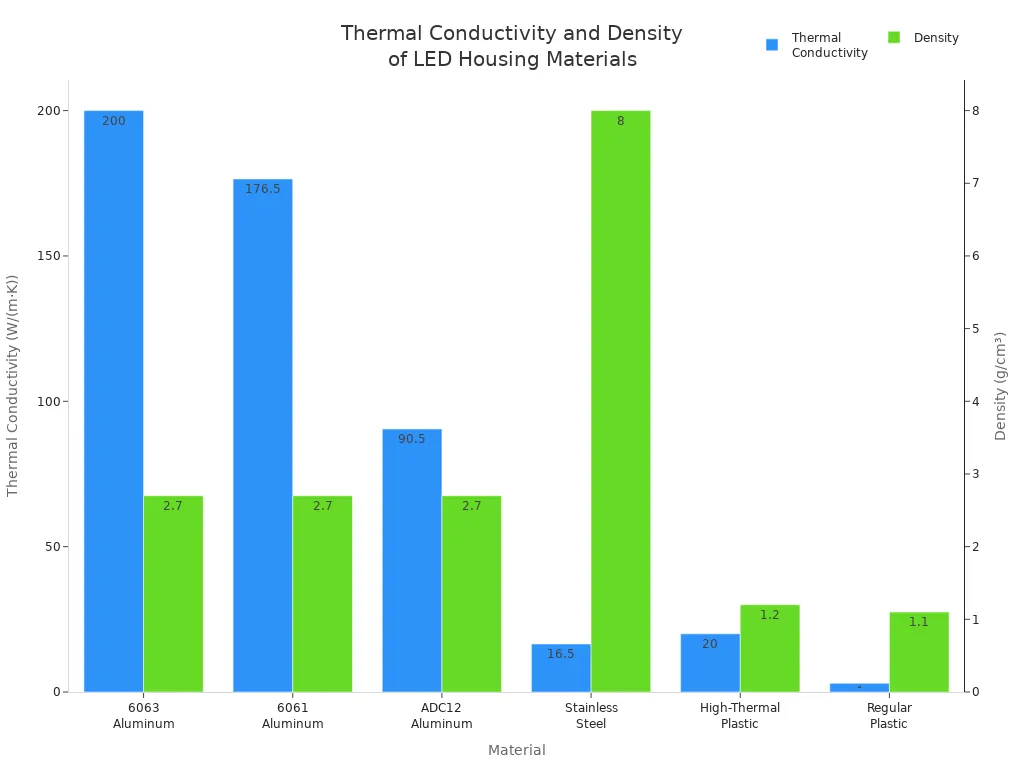
Aluminum alloys like 6063 and 6061 move heat better, so LEDs stay cool. ADC12 is stronger, so it works for thin parts. All these alloys are light, so your housings do not get heavy.
Note: Always choose an alloy that matches your LED’s needs. For outside use, pick alloys that do not rust easily.
Manufacturing Workflow for Custom Die Casting LED Housings
Detailed Mold Design Process
Making a custom LED housing starts with mold design. Mold design decides how your final product will look. Engineers use CAD software to make exact models. These models plan wall thickness, gates, and vents for smooth metal flow. The mold is made from strong tool steel. It has two parts: the cavity side and the core side.
Here is how you make a mold:
- Use CAD models for design and planning.
- Pick strong tool steel so the mold lasts long.
- CNC machines shape the mold pieces.
- Heat treatment makes the steel even harder.
- Fine machining and EDM add small, tricky details.
- Polishing makes the surface smooth and shiny.
- Put the mold together and test if it fits right.
Modern mold technology gives you close tolerances and steady results. This means your housings fit well every time.
Aluminum Die Casting Process for LED Housings
After the mold is ready, you start die casting. You heat ADC 12 aluminum alloy until it melts. Then, you push the melted metal into the steel mold with high pressure. This step shapes your aluminium die casting led housing. The process catches small details and makes strong, light parts.
The table below shows the main steps:
| Step | Name | Description |
|---|---|---|
| 1️⃣ | CAD File Review | Look at 2D/3D drawings from the customer |
| 2️⃣ | Machining Program Setup | Set up CNC machines using the design |
| 3️⃣ | Material Prep | Cut aluminum blanks to the right size |
| 4️⃣ | CNC Machining | Make sure parts are very precise, within ±0.01 mm |
| 5️⃣ | Surface Finishing | Polish, anodize, or powder coat as needed |
| 6️⃣ | Quality Inspection | Check and pack everything before sending |
You get fast production and steady quality. The process works for both small and big orders.
Finishing Techniques and Surface Treatments
After casting, you work on finishing the parts. CNC machining helps add details and cut threads. Polishing takes away rough spots and gets the surface ready. Next, you use powder coating. This uses an electric spray and heat to make a tough, even layer. Powder coating keeps the housing safe from scratches, rust, and weather.
Here is a simple finishing process:
- Clean and treat the surface first.
- Spray on powder coating with an electric charge.
- Bake in an oven to make the finish strong.
- Check for any problems and make sure it looks good.
You make sure every housing looks nice and lasts long. Quality checks at each step help your LED housings work well and look great.
Comprehensive Quality Checklist for LED Housings
Essential Documents to Request from Your LED Housing Supplier
When you buy LED housings, you should check the supplier’s quality papers. These papers help you make sure your products are good and work right. Here are the main documents you need to ask for:
- Incoming Quality Control (IQC) records – These show that the raw materials and parts are what you need and have no problems.
- In-Process Quality Control (IPQC) records – These keep track of checks during making, like soldering and where parts go.
- Final Quality Control (FQC) records – These cover tests on finished products, like electrical, mechanical, and weather checks.
- Batch test results – These prove each group of products is the same and meets your needs.
- Compliance certificates – Look for ISO 9001, CE, RoHS, E-Mark, or local papers like INMETRO or SABS.
Tip: Ask for factory check reports and lab test results. These give you more trust in the supplier’s work and product quality.
Key Inspection Points to Ensure Quality and Reliability of LED Housings
You want your LED housings to last long and work well. Careful checks at every step help you stop problems. Use this checklist to help your quality checks:
| Inspection Point Category | Key Inspection Details |
|---|---|
| Surface Condition | Look for oil, dust, scratches, marks, burrs; no loose parts, bubbles, or missing metal |
| Processing Specifications | Make sure spraying, cutting, and surface work are done right |
| Burrs and Flashes | Must be cleaned off; sprue openings filed as needed |
| Ejection Traces | Should be cleaned up |
| Internal Inspections | Use water, X-ray, or sound tests to check inside |
| Mechanical and Corrosion Tests | Test for strength and rust resistance |
| Dimensional Accuracy | Check sizes to stop problems from worn molds or bad filling |
| Inspection Approach | Do not ask for zero defects every time, so checks stay fair and useful |
You should also use tests like X-ray or sound waves to find hidden cracks or air pockets inside the housing without breaking it. Inspection papers and material certificates, like ISO 9001 or CE, show your supplier follows strict rules. When you look at these papers and check points, you help make sure your LED housings are safe, strong, and ready to sell.
Cost Factors and Pricing for Custom Aluminum Die Casting
When you start your LED housing project, you should know what affects the price. Many things change how much you pay for custom aluminum die cast parts. If you learn about these, you can make better choices and save money.
| Cost Factor | Description & Impact on Price |
|---|---|
| Material Cost | The price depends on which aluminum alloy you pick. For example, A380 is about $1.3–$1.4 per kg. ADC12 costs more, from $2–$3 per kg. If you order more, each part costs less for materials. |
| Casting Cost | Tooling can cost from $0.2 to $20 for each part. Bigger or more detailed molds make this cost go up. |
| Machining Cost | CNC machining costs between $10 and $200 per hour. If your parts need more detail or take longer to make, the price goes up. |
| Surface Treatment | Powder coating adds about $1 for each part. If your part is bigger or has more surface, this cost is higher. |
| Additional Factors | Size, weight, how many you make, and mold design all change the final price. |
You also need to think about every step in making your parts. These steps are drawing, mold making, die casting, machining, surface treatment, checking, and packing. Each step adds to the total price. The size of the machines, like die casting machines from 180 to 1650 tons, and using CNC machines, also change your costs. Most suppliers want you to order at least 100 pieces. This helps you save money by making more at once.
Cost Optimization Strategies for LED Housings
You can do a few things to keep your costs down but still get good quality. Here are some ways that work well:
- Make your mold design better. A good design helps you cast parts faster and with fewer mistakes, so you spend less fixing problems.
- Use thin-wall die casting if you can. This uses less material and makes parts faster.
- Make bigger batches. Making more at once spreads out setup costs and lowers the price for each part.
- Pick the right casting method for how many you need. Low-volume casting is good for small amounts or testing. High-volume casting is cheaper for big orders.
- Only use CNC machining where you really need it. CNC makes parts more exact but costs more, especially if you make a lot.
- Plan your finishing steps to be quick and simple. This saves money on surface treatments and other finishing work.
- Design your parts to be easy to make. Things like even wall thickness, draft angles, and ribs help lower costs.
- Choose strong die steel for your molds. Good molds last longer and let you make more parts before needing new ones.
- Use aluminum’s light weight to your advantage. Lighter parts are cheaper to ship and easier to move.
Tip: Always match your design to your budget. If you plan early and talk with your supplier, you can get the best mix of quality and price.
Avoiding Common Pitfalls of Custom Aluminum Die Casting
Design and Manufacturing Errors to Watch Out for Aluminum Die Casting
When you design and make custom aluminum die castings for LED housings, you need to look out for some common mistakes. These mistakes can make your product weaker, look bad, or not work right. Here are the main problems you might see:
- Porosity: Tiny holes can form if gas gets trapped when the metal cools. This makes the housing weaker and might cause leaks.
- Cold Shut: Sometimes, the metal does not join together well. This happens if the metal is too cold or moves too slowly. It can make weak spots.
- Shrinkage: As the metal cools, it gets smaller. If the cooling is not even or the mold is not made right, holes can show up.
- Flash: Extra metal can leak out along the edges of the mold. This happens if the pressure is too high or the mold is not closed tight.
- Warpage and Deformation: If the part cools unevenly or the design is not good, it can bend or twist.
- Inclusions: Sometimes, things like dirt or oxides get into the metal. This can make hard spots or rough areas on the surface.
- Cracks and Brittleness: If the metal mix is wrong or there is too much stress inside, the housing can crack or break.
- Misrun: If the melted metal does not fill the mold all the way, the part will not be complete.
Tip: You can stop these problems by keeping the right temperature and pressure. Make sure your mold design is good. Always keep your tools clean and follow the right steps.
How to Avoid Quality Problems of Aluminum Die Casting LED Housings
You can stop most quality problems if you follow a careful plan during every step. Check each part of the process, from getting materials ready to the last surface finish. Always add thermal management features to help your LEDs work better and last longer.
Set up strong quality checks and control systems. Make sure your supplier uses rules like ISO 9001, CE, and RoHS. Ask for checks at every step, like when materials come in, while making the parts, and after they are finished. These checks should test electrical, mechanical, and heat performance.
- Visit the factory to see how they make and check the parts.
- Look at all the papers from the supplier, like inspection and calibration records.
- Ask for samples to test if the housings are good enough.
- Use outside inspectors to check the parts before they are shipped.
- Make clear quality agreements with your supplier so everyone knows what to expect.
Note: Change your quality checks to match local rules and needed certificates. This helps you follow the law and makes sure your LED housings work well.
You now have the tools to choose the right LED housing for your project. Review each step, from design to supplier selection. Use the checklists and tips to avoid mistakes and ensure quality. When you understand the process, you make better choices and save money. Contact a trusted supplier today to discuss your aluminium die casting led housing needs.
FAQ
What is the minimum order quantity for custom aluminum die casting LED housings?
Most suppliers want you to order at least 100 pieces. This makes each part cost less and helps the factory work better. Always ask your supplier how many you need to order before you buy.
How long does it take to produce custom LED housings?
It usually takes between 4 and 8 weeks to make them. This time covers designing the mold, casting the parts, finishing, and checking quality. If your design is hard or you order a lot, it might take longer. Ask your supplier for a full schedule.
Can you use custom colors or finishes on aluminum LED housings?
Yes, you can pick from many finishes and colors. Powder coating and anodizing give different looks and protect the housing. Tell your supplier what color and finish you want when you start your design.
How do you ensure the housings fit my LED modules?
You send your LED module drawings or samples to the supplier. They use these to make molds that fit your parts exactly. You should check and approve a sample before they make all the housings.
What certifications should LED housings have for export?
Look for certifications like ISO 9001, CE, and RoHS. These show the housings are safe and good quality. Some places need extra certificates, so check the rules in your country before you order.